
What does posture mean to you?
Generally, when someone hears the word posture, they subconsciously sit up straighter, stick their chest out, and pull their shoulders back. We are all aware of what we think
our posture should look like, but do we really know how it can affect us?
[caption id="attachment_19210" align="alignleft" width="353"]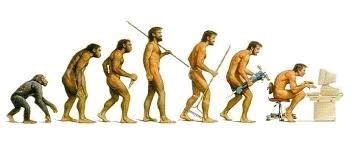 The De-Evolution of Man?[/caption]
Poor posture isn’t something we “get”. It is something our body evolves into. This diagram gives us a modern-day look at how we have evolved into an all too familiar computer posture, with some of us spending over 8 hours a day in this position.
How do we get poor posture?
Poor posture and faulty alignment can be due to a lifetime of repeated movements, such as driving a car, playing sports, or working at a desk. It can also develop after an injury, such as chronic lower back soreness, a sprained ankle, or a broken collarbone.
Overtime, some movements will cause certain muscles to overpower weaker, or smaller, muscles. This leads to us compensating with other muscles, tendons, and structures to make up for the discrepancy.
[caption id="attachment_13602" align="alignright" width="300"]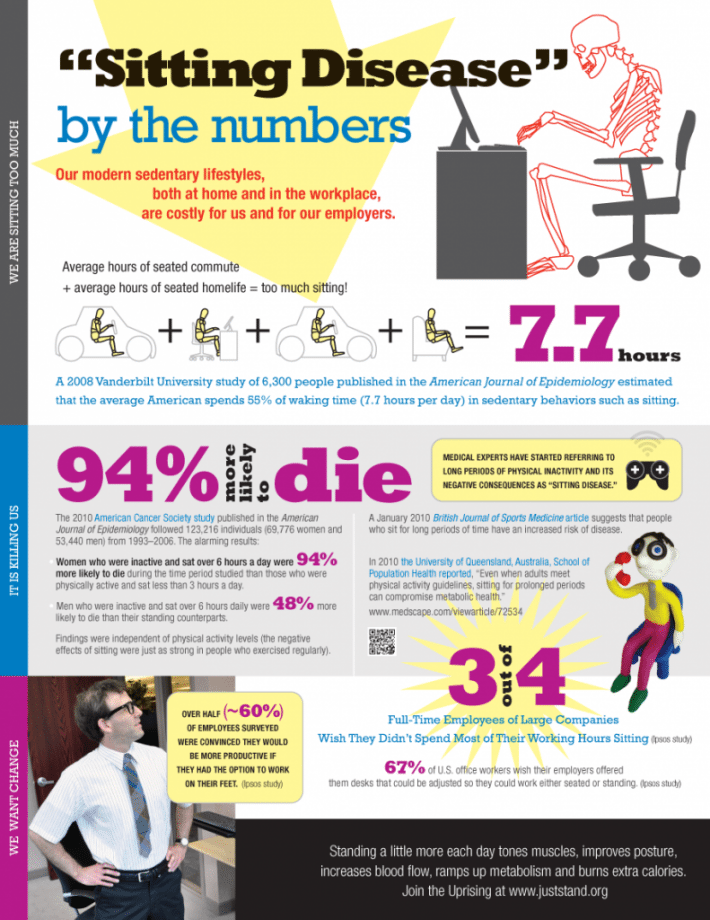 Watch out for Sitting Disease - graphic care of JustStand.org
[/caption]
Watch out for Sitting Disease - graphic care of JustStand.org
[/caption]
For example, if we sit at a desk for 8 hours a day , our chest muscles will tighten up and our shoulders will round forward. To compensate for this position, we will automatically hunch through our neck muscles and poke our chins forward to enable us to see our computer screens easier. If we multiply 8 hours a day by each working day, this quickly escalates to over 2,000 hours in a calendar year that our bodies are crouched forward over a computer. And this doesn’t include time spent looking at our tablets or smartphone s, reading a book while in transit, cooking dinner, or while we are relaxing on the couch. These continuously flexed positions will promote tightness in the hip flexors and chest muscles, which not only create a hunchback appearance, but can lead to shoulder impingement, compressed vertebrae, and knee pain, just to name a few common symptoms.
Another example is recreational or long-distance runners.
They spend anywhere from 2 to 12+ hours a week running. Yes, running is exercise, and exercise is always a good thing; however, a runner might also spend 40 hours a week at a computer. These additional running hours can also exacerbate tight hip flexors and rounded shoulders. This doesn’t mean running is a poor exercise choice. All it means is that they need to balance it out by releasing the tight areas, and strengthening the weak areas during extra strength training sessions. Balancing their training program can help create a better balance throughout their body.
Obtaining an ideal postural alignment is about creating that balance within our musculature and skeletal frame. This balance involves addressing issues such as muscle tightness, muscle weakness, and everyday wear and tear. A person’s alignment can be improved to support the body’s overall function and movement efficiency.
Balancing your posture can be achieved when your body learns to “share the load”. If our weaker, smaller muscles are constantly being overpowered by the stronger, more dominant ones, then we will be continually susceptible to injury, pain symptoms, and dysfunction throughout out kinetic chain. In order to relieve symptoms and create a more ideal alignment, we need to discuss the source of our misalignment. Treating the symptoms alone will only temporarily mask the problem.
 For example
, I am seeing a client who came to me asking for help with their shoulder impingement symptoms.
For example
, I am seeing a client who came to me asking for help with their shoulder impingement symptoms.
They said they took 3 months off of the gym and it felt better, although they gained 4 kilograms and lost a lot of their fitness. While they rested their body, the symptoms subsided. When they came back to the gym and resumed their regular routine, the impingement symptoms reappeared and they were back to square one. This is a familiar cycle that many people go through. They rest their symptoms, and the symptoms go away. But when they resume their normal activities, all the symptoms come back. This is because they haven’t treated the problem; they have only treated the symptom. Another example is using a heat pack to soothe aching neck muscles. This may reduce the symptoms, but the symptoms will keep reappearing if the problem is not corrected.
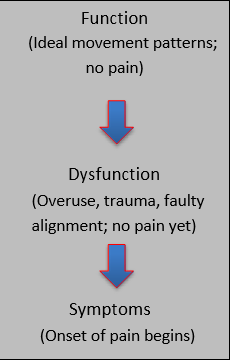
It is important to understand that by the time we feel symptoms, whether it is a sore neck or pain in the shoulder joint, we have probably already been experiencing poor alignment or a muscular dysfunction for a long time earlier. We might not feel any symptoms from having poor posture until it affects the next structure down the pathway. Therefore, a quick fix will not be the answer. Similar to how a patch on a punctured tire is only a quick fix to get you to the nearest service station.
[tweet_box design="box_12"]Part of the philosophy I instill within most of my sessions is that “the site of pain may not be the source of pain”.[/tweet_box]
Quite often there is an underlying issue occurring elsewhere in the body that causes our symptoms. Just because we feel pain in our shoulders, doesn’t necessarily mean that our shoulders are the problem.
Yes, they are showing us the symptoms; however, it could be the result of a deviation through our thoracic spine, which is offsetting our scapulae positioning, and increasing pressure in our shoulder joint. In a situation like this, which is quite common in office workers, it is important to discuss the issue occurring at the spine. This can be a trip to the physiotherapist to see if there is an imbalance between the right and left side musculature of the spine, or if one of our vertebra is rotated. If we can address this primary issue, then the shoulder symptoms have a greater chance of being alleviated.
However, we can improve our posture by correcting our alignment and muscle balance to lower the effects that poor posture contributes to our every day lives. By correcting some areas, we can relieve ourselves of painful symptoms, improve our performance, and lead a more fulfilling lifestyle.
[caption id="attachment_19226" align="aligncenter" width="620"] Common ailments due to long working hours at a desk with bad posture - image care of LifeHacker.com
[/caption]
Common ailments due to long working hours at a desk with bad posture - image care of LifeHacker.com
[/caption]
I’m calling this post “part 1” because there is just too much information to share in one shot...
Generally speaking, most of us will have a forward flexed upper trunk and show some sort of tightness through the mid to lower back (also known as the thoracolumbar area).
I have compiled a series of mobility exercises and active stretches that help target these areas. Even if you don’t think these are problem areas, performing these exercises can help improve overall range of movement, blood flow, and muscle function. While these will not fix your posture straight away, they are a good starting to point for you to assess how tight your muscles feel, and if you can feel a difference between your right and left side. You may not even be able to do some of these exercises fully, and that is okay. They look quite simple, but you will most likely feel some limitations.
[box type="warning" align="aligncenter" class="" width=""]It is important that if any pain is felt, or moderate to severe soreness afterwards, to have a thorough assessment done by a physiotherapist, athletic trainer, or a qualified health professional. If you are currently seeing a personal trainer, kinesiologist, or physiotherapist, you can show them these exercises and ask how they best fit into your current program.[/box]
I love to start each of my sessions with this Foam Roller Exercise; I call it “T-Spine Extension Rolls”.

Make sure to keep your buttocks on the ground, knees bent, and cradle the weight of your head in your hands. I start a few inches below the armpit level. Perform 3-4 “roll-back/crunch-forward” to stretch out that area of the vertebrae, then move the roller about 3-4 cm upwards towards the head and “roll-back/crunch-forward” this spot 3-4 times… continue at about 4 different segments throughout the mid to upper back. Your neck should not be tensed, make sure to rest the weight of your head in your hands to allow the upper back and shoulders to relax.
The next mobility exercise I like to do is what I call “Around the World”.
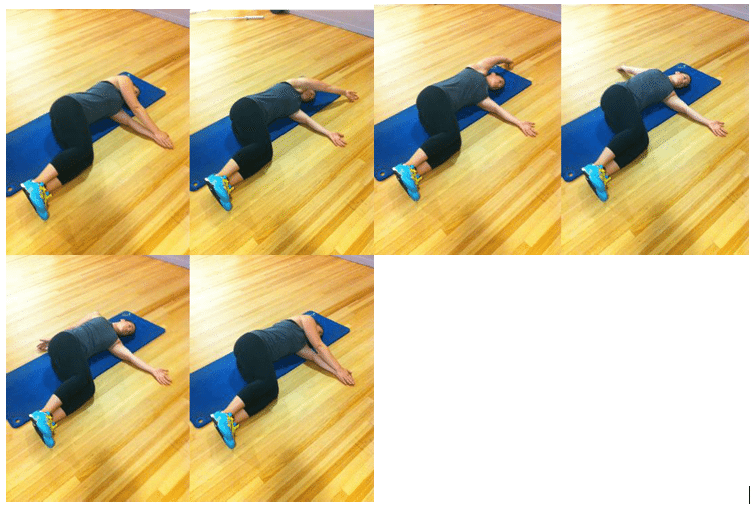
It is an excellent method to open up the chest, the scapulae, and mid back areas, which can be quite rigid after a long day at the desk. I also enjoy this one before a lifting session because it helps to mobilize some of those intercostal muscles which can be placed under strain during most strength exercises.
Lying on your side, spine straight with both knees bent at 90 degrees at the hips and at the knees. Reach both arms straight out in front of you with the palms pressed together. You may want a pillow or folded mat under your neck for support, as long as your neck can stay relaxed in a neutral position. Slowly reach the top arm up and over your head, tracing your fingers along the floor all the way if possible. Keep reaching your arm passed your head, opening up the chest to form a “T” with the arms, going around towards the lower back and buttocks, and slowly bring the arms back together. Try your best to keep the knees together without the hips shifting. You can reach your top leg out straight in front of your to help keep the hips square. It is very difficult to keep the fingers tracing the floor throughout the full range, so don’t force it; just go as far as you can without moving the hips. Repeat 5 times slow. Each round should take about 10 seconds. Repeat on the other side.
You may notice one side is quite different from the other, either tighter or you may feel it in different areas. Every single client I have done this with has the same reaction: “that feels soooooo good!”
I also like a variation that focuses more on rotation through the thoracic trunk and less through the shoulder.
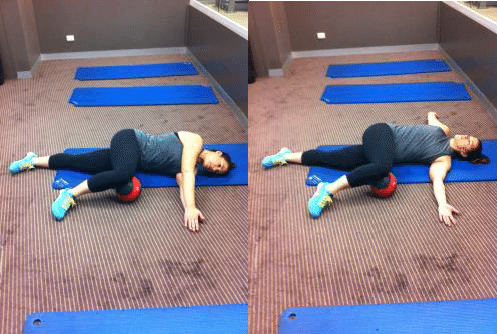
Lying on your side, spine straight with the bottom leg straight out and the top knee bent at 90 degrees resting on a medicine ball, yoga block, or a foam roller (anything about 15 - 20 cm high). Reach both arms straight out in front of you with the palms pressed together. You may want a pillow or folded mat under your neck for support, as long as your neck can stay relaxed in a neutral position.
Another mobility exercise that targets the trunk, shoulders, and lower back is called “Thread the Needle”.
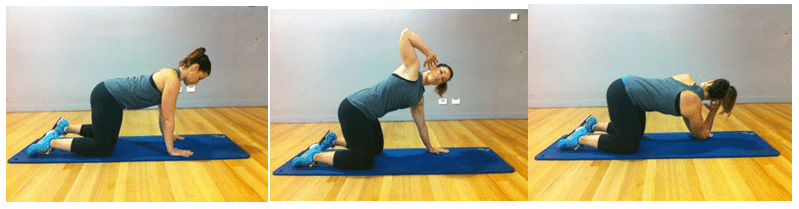
The variation I like best is with the elbow bent and the fingers behind the ear; this tends to put less pressure on the shoulder joint for those of us that are pretty stiff, and helps us rotate more from trunk. Start on all 4’s with the spine and neck in neutral, hands in line with the shoulders, and knees bent at 90 degrees. With one hand tucked behind the ear, lift the elbow up and rotate your chest towards the ceiling. Try to keep the knees evenly spaced without the hips shifting to one side. Now rotate that same elbow down and towards the wrist of the supporting arm. Repeat 5 times, and then repeat on the other side. If you do this one with a straight-arm, instead of a bend arm with the fingers behind the ear, it is still a great exercise; however I find that a lot of my clients reach the arm as far as it can go without getting as much rotation through the trunk.
A great hip opener is alternating “Pigeons”, which comes from Yoga practices and is a variation of a glute stretch.
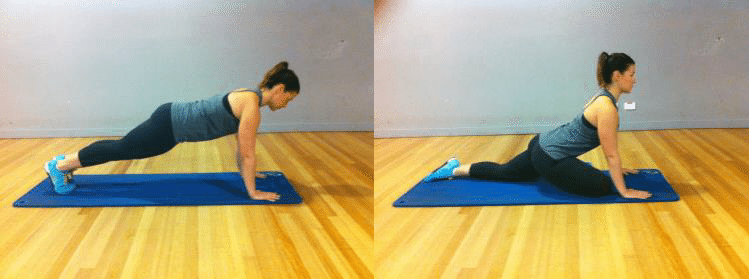
This is an excellent mobility exercise to do on a leg training day. It targets the muscles around the hip flexors and the hip rotators (your glutes!) to get primed for some deadlifts and squats. It is also great to do after a long car ride, long hours at the desk, or if the lower back is feeling tight. Start in a high plank (arms straight) with a neutral spine. Bring one knee in between the hands and pointed out to one side, so the shin bone is diagonal in front of you. Sit back into that hip to feel the glute stretch. Hold 4-5 seconds, then repeat on the other side. Repeat each side 5 times.
One of my most favorite mobility exercises to do prior to a good lifting session is alternating “Striders”.
These are excellent for opening up the hip-joint by stretching the hamstrings and adductors of the front leg, and the hips flexors of the rear leg. You will also need some upper body strength and thus this will help warm up the muscles around the shoulders and arms for the workout. For striders, you will also start in a high plank position, then bring one foot up beside that same hand. Try to support a neutral spine and the eyes looking forward. Hold this position for 3-5 seconds before returning to the high plank and repeating on the other side.
And finally, a wall posture movement called “Wall Angels”.
These are performed standing against a wall with your feet 2 inches away from the wall. Your knees should be soft, not locked, and your chin slightly tucked. It is important not to let your hips come off the wall during this exercise. Also, be mindful to keep the abs engaged and do not let the ribs flare out. Lift your arms to shoulder height with the elbows bent at 90 degrees against the wall. Rotate the back of your hands to the wall for your starting position. Keeping the abs in, slow slide the arms up into a “Y” position, then down into a “W” position, repeating 8-10 times with a 1:1 tempo (1 second up, 1 second down).
This is a difficult one to do, and will feel quite tight through the shoulders. Make sure to stop if you feel pain. There is no need to force the movement, so just try it as best you can.
In a follow-up series, I will go into some more specific reasons we may find ourselves with misaligned posture and poor biomechanics.
I will focus on other areas that commonly exhibited tightness, as well as how to activated the weaker, sometimes dormant, muscle groups that play a vital role in balancing your posture. It is important to discuss increasing the mobility of our restricted movement patterns, but equally important to learn how to get those muscles firing and working at an ideal capacity.
[divider style="dashed" top="30" bottom="30"]
 Joanna Zervas: Master in Rehabilitation Sciences (2014) Accredited Exercise Physiologist- ESSA-AEP (2012) Bachelor in Human Kinetics (2004)
Jo is an Accredited Exercise Physiologist currently working in a large health club in Melbourne, Australia. She completed her Bachelor’s in Human Kinetics from UBC in 2004, and worked as a full- time Kinesiologist in Vancouver until 2011. With an opportunity to move overseas for both professional and personal ventures, she moved to Melbourne and received her accreditation as an Exercise Physiologist. At the same health club of over 2200 members, Jo is also the Personal Training Manager with 16 trainers and their client bases in operation. Since moving to Melbourne, Jo has completed her Masters in Rehabilitation Sciences online program offered through UBC. She is currently working one-on-one with clients, specializing in postural alignment, corrected exercise, and injury management. All of her clients train to overcome injuries and to maintain the rehabilitation of past ones, all the while improving their strength and fitness.
Jo’s passion lies with rehabilitation, showing clients it is possible to train through injuries and to be able to build lean muscle mass and increase one’s strength at no matter what age. She has also completed her Olympic Weight Lifting certificate through the Australian Weightlifting Federation, and continues to implement these techniques with her clients. By combining her knowledge of the body’s physiological and anatomical adaptation processes through corrective exercise and conditioning, her client base has seen dramatic changes in their bodies’ capabilities. No matter your age, fitness level, or injuries, you can still train your body to new limits, and improve your overall quality of life.
Jo can easily be contacted at jozervas@gmail.com with website, blog, and e-books coming soon! She’s readily available to answer any questions you may have so feel free to connect.
[divider style="dashed" top="30" bottom="30"]
[caption id="attachment_19210" align="alignleft" width="353"]
The De-Evolution of Man?[/caption]Poor posture isn’t something we “get”. It is something our body evolves into. This diagram gives us a modern-day look at how we have evolved into an all too familiar computer posture, with some of us spending over 8 hours a day in this position.
How do we get poor posture?
Poor posture and faulty alignment can be due to a lifetime of repeated movements, such as driving a car, playing sports, or working at a desk. It can also develop after an injury, such as chronic lower back soreness, a sprained ankle, or a broken collarbone.
Overtime, some movements will cause certain muscles to overpower weaker, or smaller, muscles. This leads to us compensating with other muscles, tendons, and structures to make up for the discrepancy.
[caption id="attachment_13602" align="alignright" width="300"]
Watch out for Sitting Disease - graphic care of JustStand.org
[/caption]For example, if we sit at a desk for 8 hours a day , our chest muscles will tighten up and our shoulders will round forward. To compensate for this position, we will automatically hunch through our neck muscles and poke our chins forward to enable us to see our computer screens easier. If we multiply 8 hours a day by each working day, this quickly escalates to over 2,000 hours in a calendar year that our bodies are crouched forward over a computer. And this doesn’t include time spent looking at our tablets or smartphone s, reading a book while in transit, cooking dinner, or while we are relaxing on the couch. These continuously flexed positions will promote tightness in the hip flexors and chest muscles, which not only create a hunchback appearance, but can lead to shoulder impingement, compressed vertebrae, and knee pain, just to name a few common symptoms.
Another example is recreational or long-distance runners.
They spend anywhere from 2 to 12+ hours a week running. Yes, running is exercise, and exercise is always a good thing; however, a runner might also spend 40 hours a week at a computer. These additional running hours can also exacerbate tight hip flexors and rounded shoulders. This doesn’t mean running is a poor exercise choice. All it means is that they need to balance it out by releasing the tight areas, and strengthening the weak areas during extra strength training sessions. Balancing their training program can help create a better balance throughout their body.
How do we get to a "good" posture versus a "bad" posture?
Obtaining an ideal postural alignment is about creating that balance within our musculature and skeletal frame. This balance involves addressing issues such as muscle tightness, muscle weakness, and everyday wear and tear. A person’s alignment can be improved to support the body’s overall function and movement efficiency.
Balancing your posture can be achieved when your body learns to “share the load”. If our weaker, smaller muscles are constantly being overpowered by the stronger, more dominant ones, then we will be continually susceptible to injury, pain symptoms, and dysfunction throughout out kinetic chain. In order to relieve symptoms and create a more ideal alignment, we need to discuss the source of our misalignment. Treating the symptoms alone will only temporarily mask the problem.
For example
, I am seeing a client who came to me asking for help with their shoulder impingement symptoms.They said they took 3 months off of the gym and it felt better, although they gained 4 kilograms and lost a lot of their fitness. While they rested their body, the symptoms subsided. When they came back to the gym and resumed their regular routine, the impingement symptoms reappeared and they were back to square one. This is a familiar cycle that many people go through. They rest their symptoms, and the symptoms go away. But when they resume their normal activities, all the symptoms come back. This is because they haven’t treated the problem; they have only treated the symptom. Another example is using a heat pack to soothe aching neck muscles. This may reduce the symptoms, but the symptoms will keep reappearing if the problem is not corrected.
It is important to understand that by the time we feel symptoms, whether it is a sore neck or pain in the shoulder joint, we have probably already been experiencing poor alignment or a muscular dysfunction for a long time earlier. We might not feel any symptoms from having poor posture until it affects the next structure down the pathway. Therefore, a quick fix will not be the answer. Similar to how a patch on a punctured tire is only a quick fix to get you to the nearest service station.
[tweet_box design="box_12"]Part of the philosophy I instill within most of my sessions is that “the site of pain may not be the source of pain”.[/tweet_box]
Quite often there is an underlying issue occurring elsewhere in the body that causes our symptoms. Just because we feel pain in our shoulders, doesn’t necessarily mean that our shoulders are the problem.
Yes, they are showing us the symptoms; however, it could be the result of a deviation through our thoracic spine, which is offsetting our scapulae positioning, and increasing pressure in our shoulder joint. In a situation like this, which is quite common in office workers, it is important to discuss the issue occurring at the spine. This can be a trip to the physiotherapist to see if there is an imbalance between the right and left side musculature of the spine, or if one of our vertebra is rotated. If we can address this primary issue, then the shoulder symptoms have a greater chance of being alleviated.
[tweet_dis]I believe no one will ever have perfect posture - but it's a journey and not a destination after all.[/tweet_dis]
However, we can improve our posture by correcting our alignment and muscle balance to lower the effects that poor posture contributes to our every day lives. By correcting some areas, we can relieve ourselves of painful symptoms, improve our performance, and lead a more fulfilling lifestyle.
[caption id="attachment_19226" align="aligncenter" width="620"]
Common ailments due to long working hours at a desk with bad posture - image care of LifeHacker.com
[/caption]I’m calling this post “part 1” because there is just too much information to share in one shot...
Posture is always a popular topic and it is something that relates to everyone, whether you are a desk jockey, a gym junkie, a weekend warrior, or an élite athlete. Follow-up posts will include more specific areas of the body that contribute to poor alignment, what the symptoms can manifest into, and what you can do to prevent and improve them. During this point, I will elaborate with some mobility exercises that everyone can add into their daily regimen and their warm-up routine prior to a workout. They are a fairly simple starting point based on the symptoms of the majority of people I work with.
6 Every Day Movements that can help improve your posture
Generally speaking, most of us will have a forward flexed upper trunk and show some sort of tightness through the mid to lower back (also known as the thoracolumbar area).
I have compiled a series of mobility exercises and active stretches that help target these areas. Even if you don’t think these are problem areas, performing these exercises can help improve overall range of movement, blood flow, and muscle function. While these will not fix your posture straight away, they are a good starting to point for you to assess how tight your muscles feel, and if you can feel a difference between your right and left side. You may not even be able to do some of these exercises fully, and that is okay. They look quite simple, but you will most likely feel some limitations.
[box type="warning" align="aligncenter" class="" width=""]It is important that if any pain is felt, or moderate to severe soreness afterwards, to have a thorough assessment done by a physiotherapist, athletic trainer, or a qualified health professional. If you are currently seeing a personal trainer, kinesiologist, or physiotherapist, you can show them these exercises and ask how they best fit into your current program.[/box]
Movement #1: T-Spine Extension Rolls
I love to start each of my sessions with this Foam Roller Exercise; I call it “T-Spine Extension Rolls”.
Make sure to keep your buttocks on the ground, knees bent, and cradle the weight of your head in your hands. I start a few inches below the armpit level. Perform 3-4 “roll-back/crunch-forward” to stretch out that area of the vertebrae, then move the roller about 3-4 cm upwards towards the head and “roll-back/crunch-forward” this spot 3-4 times… continue at about 4 different segments throughout the mid to upper back. Your neck should not be tensed, make sure to rest the weight of your head in your hands to allow the upper back and shoulders to relax.
Movement #2: Around the World
The next mobility exercise I like to do is what I call “Around the World”.
It is an excellent method to open up the chest, the scapulae, and mid back areas, which can be quite rigid after a long day at the desk. I also enjoy this one before a lifting session because it helps to mobilize some of those intercostal muscles which can be placed under strain during most strength exercises.
Lying on your side, spine straight with both knees bent at 90 degrees at the hips and at the knees. Reach both arms straight out in front of you with the palms pressed together. You may want a pillow or folded mat under your neck for support, as long as your neck can stay relaxed in a neutral position. Slowly reach the top arm up and over your head, tracing your fingers along the floor all the way if possible. Keep reaching your arm passed your head, opening up the chest to form a “T” with the arms, going around towards the lower back and buttocks, and slowly bring the arms back together. Try your best to keep the knees together without the hips shifting. You can reach your top leg out straight in front of your to help keep the hips square. It is very difficult to keep the fingers tracing the floor throughout the full range, so don’t force it; just go as far as you can without moving the hips. Repeat 5 times slow. Each round should take about 10 seconds. Repeat on the other side.
You may notice one side is quite different from the other, either tighter or you may feel it in different areas. Every single client I have done this with has the same reaction: “that feels soooooo good!”
Movement #2b: Variation of Around the World
I also like a variation that focuses more on rotation through the thoracic trunk and less through the shoulder.
Lying on your side, spine straight with the bottom leg straight out and the top knee bent at 90 degrees resting on a medicine ball, yoga block, or a foam roller (anything about 15 - 20 cm high). Reach both arms straight out in front of you with the palms pressed together. You may want a pillow or folded mat under your neck for support, as long as your neck can stay relaxed in a neutral position.
Movement #3: Thread the Needle stretch
Another mobility exercise that targets the trunk, shoulders, and lower back is called “Thread the Needle”.
The variation I like best is with the elbow bent and the fingers behind the ear; this tends to put less pressure on the shoulder joint for those of us that are pretty stiff, and helps us rotate more from trunk. Start on all 4’s with the spine and neck in neutral, hands in line with the shoulders, and knees bent at 90 degrees. With one hand tucked behind the ear, lift the elbow up and rotate your chest towards the ceiling. Try to keep the knees evenly spaced without the hips shifting to one side. Now rotate that same elbow down and towards the wrist of the supporting arm. Repeat 5 times, and then repeat on the other side. If you do this one with a straight-arm, instead of a bend arm with the fingers behind the ear, it is still a great exercise; however I find that a lot of my clients reach the arm as far as it can go without getting as much rotation through the trunk.
Movement #4: The Pigeon Stretch
A great hip opener is alternating “Pigeons”, which comes from Yoga practices and is a variation of a glute stretch.
This is an excellent mobility exercise to do on a leg training day. It targets the muscles around the hip flexors and the hip rotators (your glutes!) to get primed for some deadlifts and squats. It is also great to do after a long car ride, long hours at the desk, or if the lower back is feeling tight. Start in a high plank (arms straight) with a neutral spine. Bring one knee in between the hands and pointed out to one side, so the shin bone is diagonal in front of you. Sit back into that hip to feel the glute stretch. Hold 4-5 seconds, then repeat on the other side. Repeat each side 5 times.
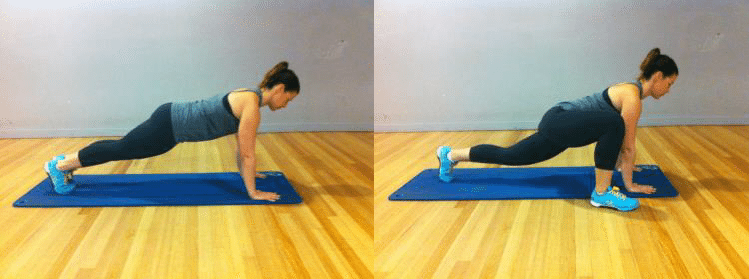
Movement #5: The Strider Stretch
One of my most favorite mobility exercises to do prior to a good lifting session is alternating “Striders”.
These are excellent for opening up the hip-joint by stretching the hamstrings and adductors of the front leg, and the hips flexors of the rear leg. You will also need some upper body strength and thus this will help warm up the muscles around the shoulders and arms for the workout. For striders, you will also start in a high plank position, then bring one foot up beside that same hand. Try to support a neutral spine and the eyes looking forward. Hold this position for 3-5 seconds before returning to the high plank and repeating on the other side.
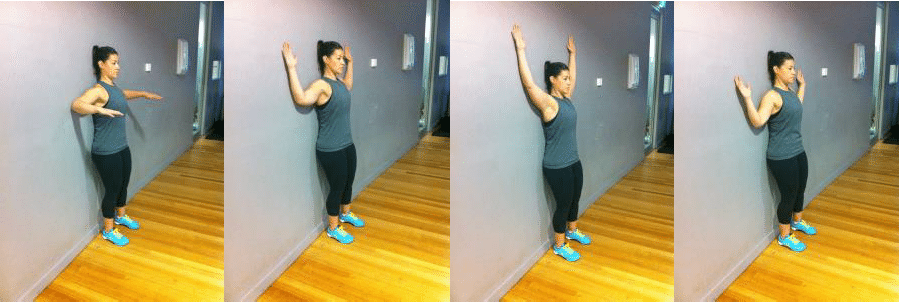
Movement #6: Wall Angels
And finally, a wall posture movement called “Wall Angels”.
These are performed standing against a wall with your feet 2 inches away from the wall. Your knees should be soft, not locked, and your chin slightly tucked. It is important not to let your hips come off the wall during this exercise. Also, be mindful to keep the abs engaged and do not let the ribs flare out. Lift your arms to shoulder height with the elbows bent at 90 degrees against the wall. Rotate the back of your hands to the wall for your starting position. Keeping the abs in, slow slide the arms up into a “Y” position, then down into a “W” position, repeating 8-10 times with a 1:1 tempo (1 second up, 1 second down).
This is a difficult one to do, and will feel quite tight through the shoulders. Make sure to stop if you feel pain. There is no need to force the movement, so just try it as best you can.
Now that I'm working on mobility, what's next?
In a follow-up series, I will go into some more specific reasons we may find ourselves with misaligned posture and poor biomechanics.
I will focus on other areas that commonly exhibited tightness, as well as how to activated the weaker, sometimes dormant, muscle groups that play a vital role in balancing your posture. It is important to discuss increasing the mobility of our restricted movement patterns, but equally important to learn how to get those muscles firing and working at an ideal capacity.
[divider style="dashed" top="30" bottom="30"]
Author Bio:
Joanna Zervas: Master in Rehabilitation Sciences (2014) Accredited Exercise Physiologist- ESSA-AEP (2012) Bachelor in Human Kinetics (2004)
Jo is an Accredited Exercise Physiologist currently working in a large health club in Melbourne, Australia. She completed her Bachelor’s in Human Kinetics from UBC in 2004, and worked as a full- time Kinesiologist in Vancouver until 2011. With an opportunity to move overseas for both professional and personal ventures, she moved to Melbourne and received her accreditation as an Exercise Physiologist. At the same health club of over 2200 members, Jo is also the Personal Training Manager with 16 trainers and their client bases in operation. Since moving to Melbourne, Jo has completed her Masters in Rehabilitation Sciences online program offered through UBC. She is currently working one-on-one with clients, specializing in postural alignment, corrected exercise, and injury management. All of her clients train to overcome injuries and to maintain the rehabilitation of past ones, all the while improving their strength and fitness.
Jo’s passion lies with rehabilitation, showing clients it is possible to train through injuries and to be able to build lean muscle mass and increase one’s strength at no matter what age. She has also completed her Olympic Weight Lifting certificate through the Australian Weightlifting Federation, and continues to implement these techniques with her clients. By combining her knowledge of the body’s physiological and anatomical adaptation processes through corrective exercise and conditioning, her client base has seen dramatic changes in their bodies’ capabilities. No matter your age, fitness level, or injuries, you can still train your body to new limits, and improve your overall quality of life.
Jo can easily be contacted at jozervas@gmail.com with website, blog, and e-books coming soon! She’s readily available to answer any questions you may have so feel free to connect.
[divider style="dashed" top="30" bottom="30"]


